This is an old revision of the document!
Table of Contents
Network
Remote control your network computers by defining certain actions that are executed on every computer start and create a flight status page for web display.
 Note: This here has nothing to do with accessing your flight simulator with FS-FlightControl over network. Therefore please use our SimConnect Network Wizard.
Network Computer Control
This section provides you with an easy way of configuring several startup actions for all your network computers that are involved in your flight simulator setup.
It also includes a full-screen waiting screen that is displayed on your network client computers till your flight simulator is fully started.

First build your network client by clicking on the button Build Client on the right side of the screen and start this client on all of your network computers that you want to control with FS-FlightControl.
Note: You can configure certain parameters of the network client in the Settings module.

Afterwards add all your network computers by clicking on the button Add New Computer.
Network Client Software
This network client needs to be copied and started to all of your network computers that you want to control with FS-FlightControl.
Full-Screen Waiting Screen
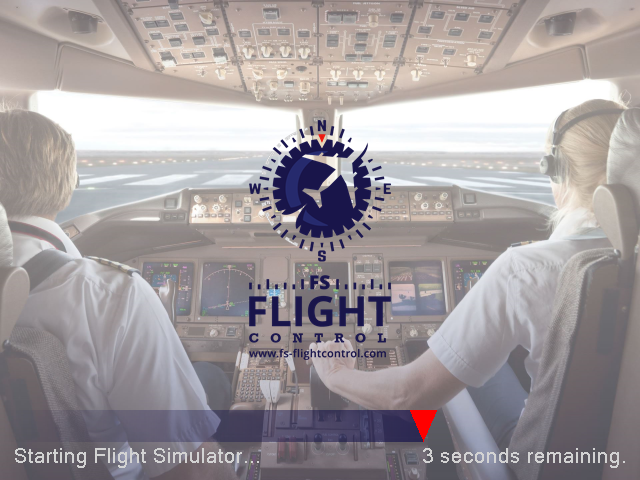
To make sure the pilots do not see anything from the background tasks needed to start your flight simulator, a full-screen waiting screen is displayed on all attached monitors (also panel monitors) till all tasked have completed and the simulator is ready to go.
You can fully customize this waiting screen to your needs in the Settings module and change the background image, logo and even text (for example also translate it to your language).
Note: Although you can use the waiting screen in all license editions, the customization is only possible with the commercial license.
Note: If you do not want this full-screen waiting screen to appear, just start the client with the command line parameter /nofullscreen.
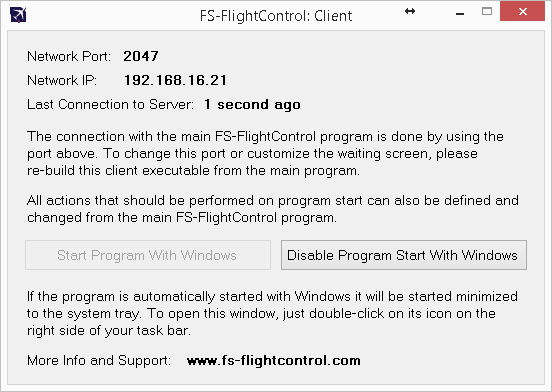
Information
On the top of the client interface you can see some useful information.
First you can see the network port which is used to communicate with the FS-FlightControl program.
Note: This port can be changed in the Settings module. Please keep in mind that you need to rebuild the client (and copied to your network computers again) after the port is changed.
Beside the connection port also the IP address of the client computer is displayed. Please enter this IP address in the network dialog of FS-FlightControl when you add this computer as new computer there.
Note: You may find more than one IP address displayed here. Then this computer have more than one network interfaces active. If you don't know which one is the right one to use, you just need to test it.
Below that you can see the time of the last connection to the server.
Startup Option

You have the option to directly start this network client with Windows which is highly recommended as only with this setting the full screen waiting screen can be displayed.
Network Computer Selection
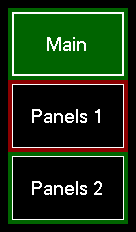
On the left side all configured network computers are listed and selectable with just one click.
If there is a problem connecting to one of your network computers this computer will be surrounded by a red square. As long everything is fine this square will be green. This way you have an easy overview of the status of all your network computers involved in your flight simulator setup.
Computer Configuration
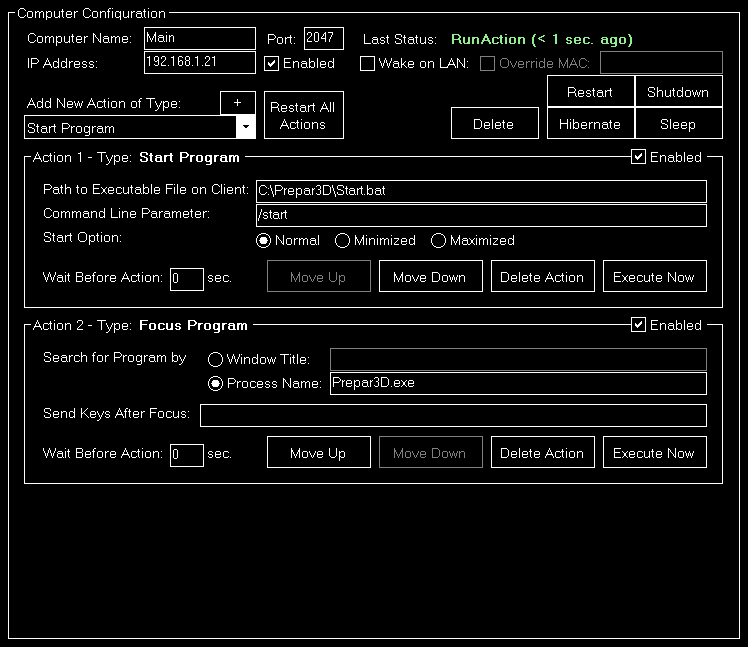
For each of your computers first enter a name which will be displayed on the button that correspondents to this computer.
Next you need to enter the IP address where the computer is reachable in your network. This IP address is displayed on the client software that you started on your network computer (see above).
The same is true for the following Port field: Please enter here the network port which is displayed on the client software, too.
We suggest to enable the check box “Enabled” not before you have completed the full computer configuration including the assignment of action. This ensures that you can finish everything before the network computer starts to react on your actions. With this check box you can enable or disable the network computer at any time.
If you want to delete this computer again, click on the Delete Computer button.
You can also trigger a direct action for this computer using the Restart, Shutdown, Hibernate or Sleep buttons.
Below you will find two information texts showing the Last Status sowie Last Connect time to the network computer.
Note: The Last Status text will be shown in red if there is no connection to the network computer and in green otherwise.
FS-FlightControl is also able to remotely start other computers using Wake on LAN. Just make sure that the computers themselves support that and the function is enabled in BIOS.
Note: Before the Wake on LAN option can be used there needs to be one successful connection to the FS-FlightControl network client software running on that computer first to collect all necessary information.
Network Actions
You can assign any number of startup actions to your network computers.
Beside running these actions one after the other on startup of the network computer to prepare the environment for flight simulator use - which is the main purpose this module -, you can also execute individual actions manually at any time to for example restart a specific application on this computer. This way the module can be used as very flexible remote control solution.
There are four types of actions that can be used. These are explained in more detailed in the following individually.
Common Action Settings

On the top right of each action section you can enable or disable the action for being executed on startup of the remote computer.
Note: You can still execute a disabled action manually, it will just not be used as startup action automatically.

Additionally for all actions you can define a wait time in seconds after the execution of the last action before the action is executed at the startup of the computer, for example:
First action has wait time of 10 seconds and second action has wait time of 20 seconds. Then the first action is started 10 seconds after the computer has started and the second action 30 seconds after the computer has started.
Start Program Action
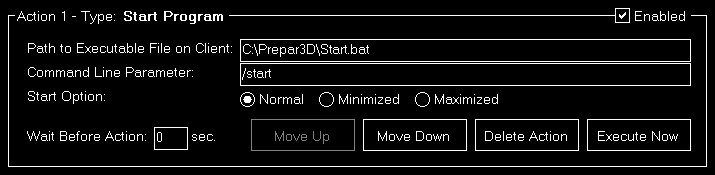
This action starts a program on your remote network computer.
Therefore please enter first the path to the program file that should be executed on your remote computer.
Note: This path needs to be the exact path on your remote computer and normally ends on .exe, but it could also end on .bat if you want to run a batch file.
Next you can enter optional command line parameters for the program to start. Leave the field empty if it does not need any.
Finally you can define if the program should be started in normal, minimized or maximized mode.
Note: Not all programs support all three modes. So it is possible that a started program just ignores this settings.
Terminate Program Action
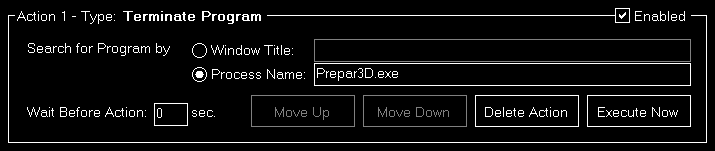
Use this action to terminate (kill) a running program on your remote network computer.
To find the right program, first decide if you want to search for it by window title or process name and enter the search text into the corresponding field.
Note: The window title search text can be only a part of the full window title of the program, too, but the process name has to be the exact full name of the process you are searching for (as shown in Task Manager, but without .exe). Both are not case-sensitive.
Focus Program Action
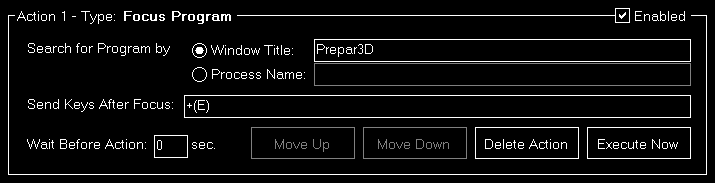
If you want to set the focus on a certain program (bring it to front), this action type is the right one for you.
To find the right program, first decide if you want to search for it by window title or process name and enter the search text into the corresponding field.
Note: The window title search text can be only a part of the full window title of the program, but the process name has to be the exact full name of the process you are searching for (as shown in Task Manager, but without .exe). Both are not case-sensitive.
Additionally you may send some custom key strokes to the program after it got focus. The exact syntax for sending keys is explained in this appendix.
Restart or Shutdown Action

With this action you can restart, shutdown, hibernate or sleep your remote computer. Therefore just select the desired option.
Note: Not all computers are configured to support hibernate or sleep mode. So it is possible that these two mode do not work on all of your computers.
Quick Action Buttons
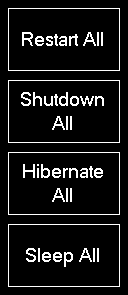
On the right side of the screen you can find quick action buttons for restart, shutdown, hibernate and sleep of all your connected computers.
This way you can for example shutdown or restart your whole flight simulator environment with just one click.
Status Page for Web Display

In the bottom right you can find the button Status Page Web which will show the configuration options for the Status Page for Web Display.
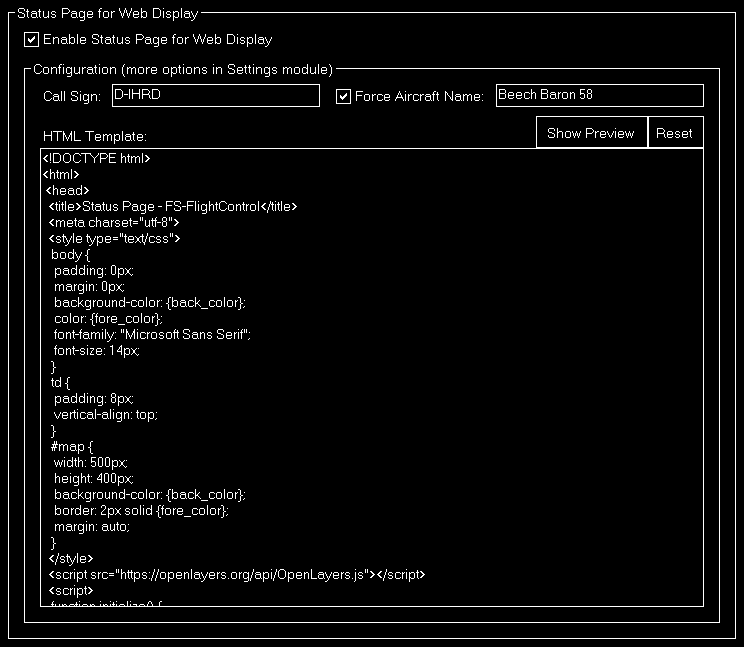
If you want to share your current flight information you can enable a status page for web display.
This can also be used for display the current flight status on a public screen outside of the flight simulator or on an internet page, for example.
Note: In the Settings module you can define where the generated web page should be placed: It can be directly outputted as web server, saved to your local file system or uploaded to a certain FTP server.
To enable or disable the status page for web display again click on the corresponding check box after you clicked on the “Status Page Web” button in the bottom right of the screen.
Configuration
After the status page for web display is enabled you can configure how it should look like.
Variable Definitions

First you can define certain variables which then can be used as placeholders inside the HTML template of the web page. Start with entering your call sign.
By default the system displays the aircraft name provided by the flight simulator. As this is not always “nicely” formatted you have the option to force (overwrite) this name by any name you want.
HTML Template
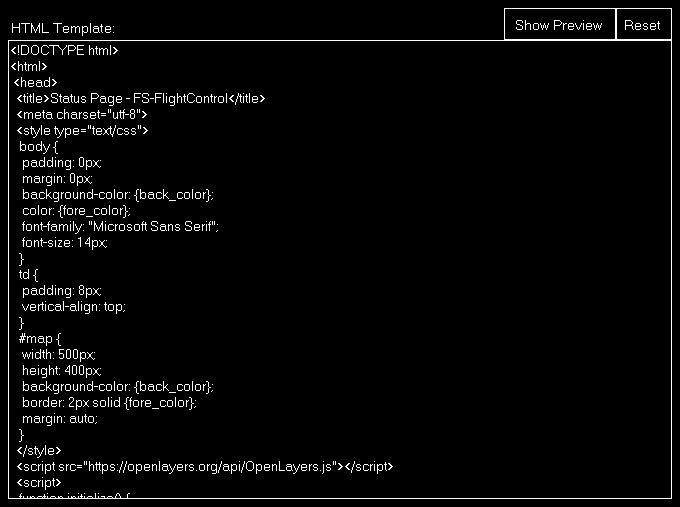
Now you can create a custom HTML template that should be used to generate the status page.
The possible placeholders in the HTML template are explained in this appendix.
There is a default HTML template provided which shows how to use these placeholders and even how to show the current aircraft location on Google Maps. A status page generated by the default template looks like this:
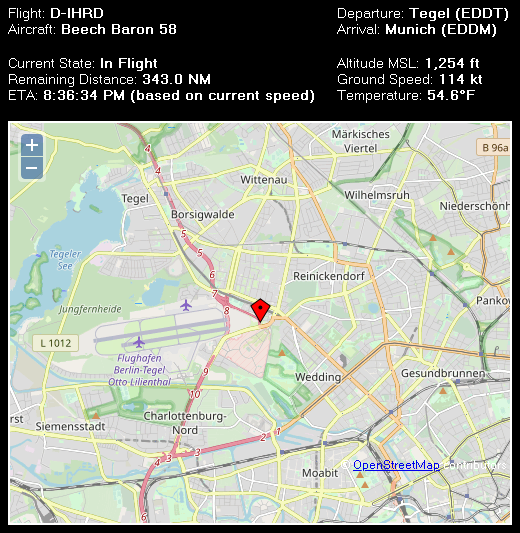
Based on that you can customize the status page to your needs.
A click on the Show Preview button opens a status page example in your default browser and Reset resets the HTML template to default.
Note: The preview is only available if you are connected to a simulator.
Appendix: Syntax for Send Keys
Each key is represented by one or more characters. To specify a single keyboard character, use the character itself. For example, to represent the letter A, just enter the text A. To represent more than one character, append each additional character to the one preceding it. To represent the letters A, B, and C, specify the parameter as ABC.
The plus sign +, caret ^, percent sign %, tilde ~ and parentheses () have special meanings. To specify one of these characters, enclose it within braces {}. For example, to specify the plus sign, use {+}. To specify brace characters, use {{} and {}}. Brackets have no special meaning, but you have to enclose them in braces, too, like {[} and {]}.
To specify characters that are not displayed when you press a key, such as ENTER or TAB and keys that represent actions rather than characters, use the codes in the following table:
| Key | Code |
|---|---|
BACKSPACE | {BACKSPACE}, {BS} or {BKSP} |
BREAK | {BREAK} |
CAPS LOCK | {CAPSLOCK} |
CURSOR DOWN | {DOWN} |
CURSOR UP | {UP} |
CURSOR LEFT | {LEFT} |
CURSOR RIGHT | {RIGHT} |
DEL or DELETE | {DEL} or {DELETE} |
END | {END} |
ENTER | {ENTER} |
ESC | {ESC} |
HELP | {HELP} |
HOME | {HOME} |
INS or INSERT | {INS} or {INSERT} |
NUM LOCK | {NUMLOCK} |
PAGE DOWN | {PGDN} |
PAGE UP | {PGUP} |
PRINT SCREEN | {PRTSC} |
SCROLL LOCK | {SCROLLLOCK} |
TAB | {TAB} |
F1 | {F1} |
F2 | {F2} |
F3 | {F3} |
F4 | {F4} |
F5 | {F5} |
F6 | {F6} |
F7 | {F7} |
F8 | {F8} |
F9 | {F9} |
F10 | {F10} |
F11 | {F11} |
F12 | {F12} |
F13 | {F13} |
F14 | {F14} |
F15 | {F15} |
F16 | {F16} |
Keypad + | {ADD} |
Keypad - | {SUBTRACT} |
Keypad * | {MULTIPLY} |
Keypad / | {DIVIDE} |
To specify keys combined with any combination of the SHIFT, CTRL and ALT keys, precede the key code with one or more of the following codes:
| Key | Code |
|---|---|
SHIFT | + |
CTRL | ^ |
ALT | % |
To specify that any combination of SHIFT, CTRL and ALT should be held down while several other keys are pressed, enclose the code for those keys in parentheses. For example, to specify to hold down SHIFT while E and C are pressed, use +(EC). To specify to hold down SHIFT while E is pressed, followed by C without SHIFT, use +EC.
To specify repeating keys, use the form {key count}. You must put a space between key and count. For example, {LEFT 42} means press the CURSOR LEFT key 42 times; {H 10} means press H 10 times.
Appendix: Possible Placeholders in HTML template
Following placeholders can be used inside the HTML template:
| Placeholder | Description |
|---|---|
| {fore_color} | Foreground color based on application color schema. |
| {back_color} | background color based on application color schema. |
| {airport_departure} | Departure airport as specified. |
| {airport_arrival} | Arrival airport as specified. |
| {call_sign} | Call sign as specified. |
| {aircraft} | Aircraft name as provided by flight simulator or as specified. |
| {latitude} | Aircraft latitude. |
| {longitude} | Aircraft longitude. |
| {current_state} | Current aircraft state: This can be either Parking, Taxi or In Flight. |
| {remaining_distance} | Remaining distance to arrival airport. |
| {ete} | Estimated time enroute (ETE) to arrival airport. |
| {eta} | Estimated time of arrival (ETA) on arrival airport. |
| {altitude_indicated} | Indicated altitude. |
| {altitude_msl} | Aircraft altitude above mean sea level (MSL). |
| {altitude_agl} | Aircraft altitude above ground level (AGL). |
| {heading_true} | True aircraft heading. |
| {heading_magnetic} | Magnetic aircraft heading. |
| {airspeed_indicated} | Aircraft indicated speed (IAS). |
| {airspeed_true} | Aircraft true speed (TAS). |
| {ground_speed} | Aircraft ground speed. |
| {vertical_speed} | Aircraft vertical speed. |
| {outside_temperature} | Outside air temperature. |