Table of Contents
Settings
Customize this program to your needs with detailed, even aircraft-specific settings. Change map colors, SimConnect settings and many more options available.
But although a lot of very detailed customization options are available in these modules, FS-FlightControl is designed in a way that you do not have to touch anything here to just use the program.
It is perfectly usable with the default settings and only if you need something special then this is the right place to look at.
Simulator Related Settings
All settings in this area will be saved together with the corresponding simulator.
Simulator

At the very first program start, one simulator is automatically created, but you can add more simulators and then switch between them at any time.
Select Simulator Type
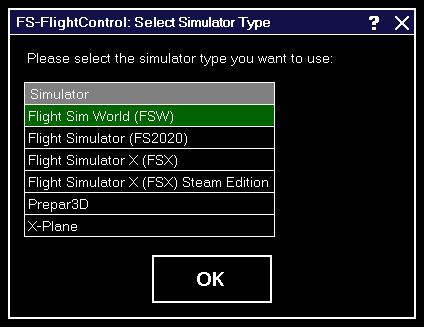
After you have clicked on the button Create New Simulator, this dialog will appear asking you which type of simulator you want to create.
Simulator Settings for FS2020/Prepar3D/FSX/FSW
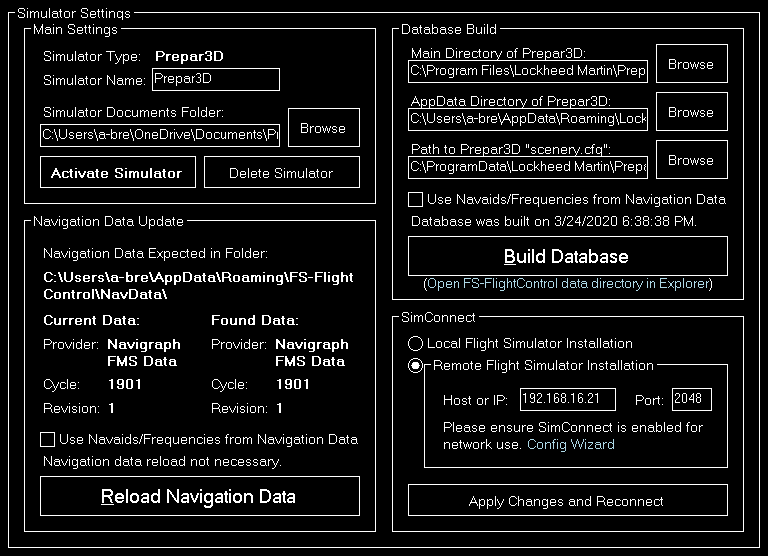
If a simulator of type FS2020, Prepar3D, FSX or FSW is selected these settings will be available.
Main Settings
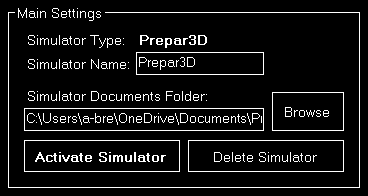
Below the not changable simulator type you can define a custom name for this simulator.
Additionally you can choose the simulator documents folder which is automatically detected if the simulator is installed locally.
If the selected simulator is currently not active, you can use the buttons Activate Simulator to activate it or Delete Simulator to delete it again.
 Note: You can change the active simulator also by clicking on the connection status in the Title Bar.
Note: The documents folder is not required for Microsoft Flight Simulator (FS2020) and thus the corresponding field deactivated.
Database Build
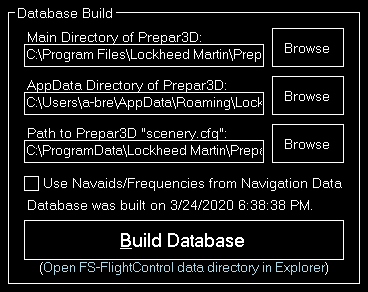
The database build is explained in the Database Build installation section.
Navigation Data Update
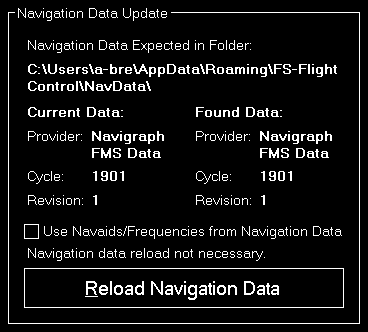
This area is explained in the Navigation Data Update dialog section.
SimConnect
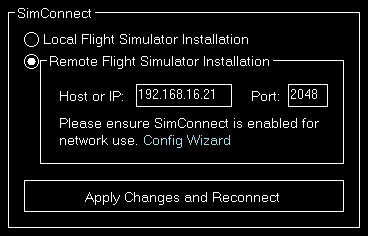
You can choose here if FS-FlightControl should connect to a local or remote flight simulator installation.
Remote Flight Simulator Installation

If you want FS-FlightControl to access a flight simulator installation that is not located on the same computer as FS-FlightControl itself, these SimConnect Network Access parameters need to be defined.
Note: To make this configuration as easy as possible you can use the SimConnect Network Wizard.
Simulator Settings for X-Plane
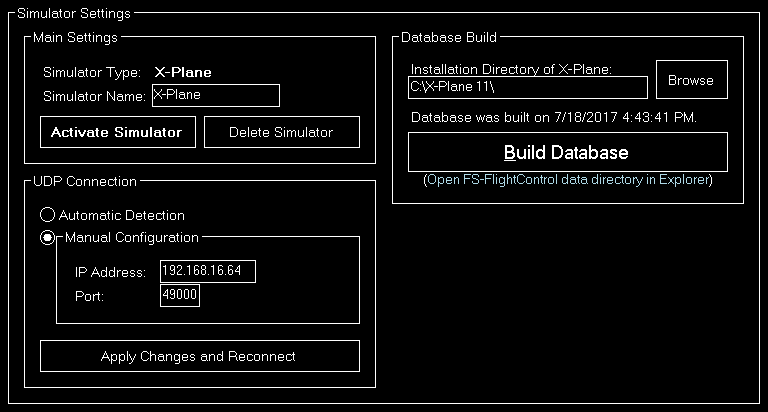
If a simulator of type X-Plane is selected these settings will be available.
Main Settings
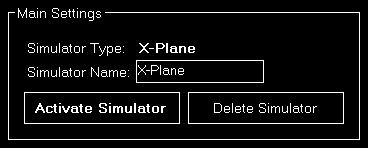
Below the not changable simulator type you can define a custom name for this simulator.
If the selected simulator is currently not active, you can use the buttons Activate Simulator to activate it or Delete Simulator to delete it again.
Database Build
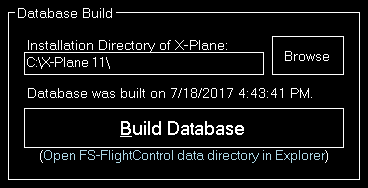
The database build is explained in the Database Build installation section.
UDP Connection
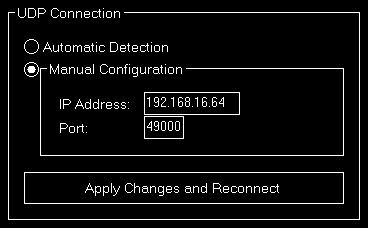
You can choose here if the connection parameters should be detected automatically or you want to set them manually.
In most cases all connection parameters can be automatically detected even if X-Plane does not run on the same computer as FS-FlightControl.
Manual Configuration
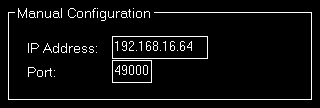
But if the automatic detection does not work for any reason, you can configure the connection manually here.
Note: The port is almost always the default port 49000, only change it if there is a specific reason for it.
Position
These settings are related to the Position module.
General
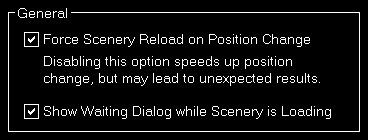
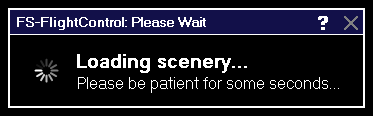
You can choose here if the scenery should be reloaded after a position is changed.
Note: The forced scenery reload is enabled by default as disabling it may lead to unexpected results (like aircraft crash) especially if the new location is far away from the old one.
Furthermore, following waiting dialog while the simulator is loading its scenery can be enabled:
Conditions
These settings are related to the Conditions module.
Weather Engine

Let FS-FlightControl know here which software is used as weather engine to ensure all features of the Conditions module work properly.
Note: For Active Sky additional parameters need to be entered in the Third Party settings first.
Aircraft
These settings are related to the Aircraft module.
Change Aircraft

If you own a commercial license you can disable the complete change aircraft functionality.
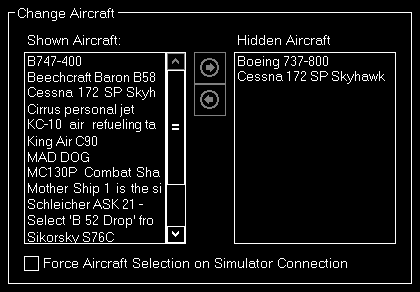
It is also possible to reduce the aircraft that are available to the user and show only relevant ones.
Furthermore, you can force an aircraft selection dialog on program start.
Motion
These settings are related to the Motion module.
Brunner Elektronik

This section allows to configure the motion interface to Brunner Elektronik products.
Motion Platform
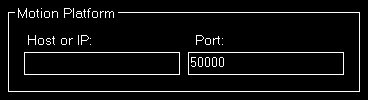
Enter the host or IP as well as the UDP port that should be used to control the motion platform.
Control Loading

The host or IP as well as the TCP port that should be used to connect to the CLS2Sim software by Brunner Elektronik can be entered here. The Brunner Elektronik connection then can be used in the Motion module.
Note: CLS2Sim version v3.20.0 or newer is required.
Note: Please make sure that Remote control is enabled for TCP in the CLS2Sim settings and the TCP port is set accordingly (only TCP is needed for FS-FlightControl connection). UDP communication is not used by FS-FlightControl.
Third Party
Here you can define necessary parameters to connect to third party products supported by FS-FlightControl.
JeeHell
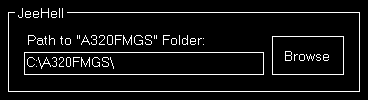
The path to the A320FMGS directory of JeeHell can be entered here. The JeeHell connection then can be used in the Flight Plan module; the Failures and Aircraft modules use FSUIPC to connect to JeeHell.
Note: Please make sure that JeeHell Hardware Interface is started. If FS-FlightControl runs on a different computer than JeeHell itself, you also need WideFS installed.
AST
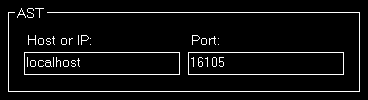
The host or IP as well as the port that should be used to connect to AST (Aircraft Simulation Technology) can be entered here. The AST connection then can be used in the Failures module.
Project Magenta
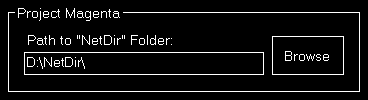
The path to the NetDir of Project Magenta can be entered here. The Project Magenta connection then can be used in the Flight Plan module; the Failures module uses FSUIPC to connect to Project Magenta.
Flight Sim Labs
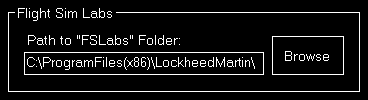
The path to the FSLabs directory of Flight Sim Labs which is either below the flight simulator directory (for older installations) or below the Prepar3D add-ons directory within the Windows Documents folder (for newer installations) can be entered here. The direct Flight Sim Labs connection then can be used in the Flight Plan module.
Active Sky
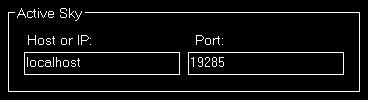
The host or IP as well as the port that should be used to connect to Active Sky P3D or XP can be entered here. The Active Sky connection then can be used in the Conditions module.
Note: The old ASP4 version is not fully supported as certain API features are missing. Please use Active Sky P3D (for Prepar3D) or XP (for X-Plane).
Aerosoft Airbus
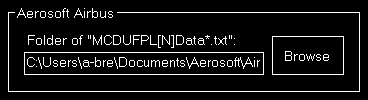
Now you can enter the path to the Aerosoft Airbus documents directory (also the older Extended Version is supported) here. The Aerosoft Airbus connection then can be used in the Flight Plan module.
Wilco Airbus
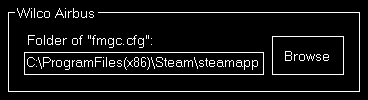
You can enter the path to the Wilco/FeelThere Airbus directory here. The Wilco Airbus connection then can be used in the Flight Plan module.
Mindstar
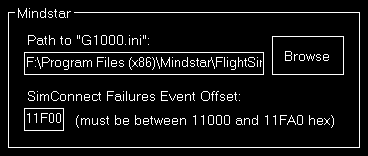
You can enter the path to the Mindstar G1000.ini file here. The Mindstar connection then can be used in the Failures module.
Additionally the offset for the SimConnect event IDs need to be specified as hex value. Starting from this ID the SimConnect events will be assigned to the Mindstar G1000 failures.
EFIS Fly
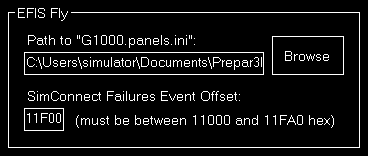
You can enter the path to the EFIS Fly G1000.panels.ini file here. The EFIS Fly connection then can be used in the Failures module.
Additionally the offset for the SimConnect event IDs need to be specified as hex value. Starting from this ID the SimConnect events will be assigned to the EFIS Fly G1000 failures.
Flight1
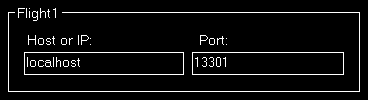
The host or IP as well as the port that should be used to connect to Flight1 VISPRO flight simulator plug-in can be entered here. The Flight1 connection then can be used in the Failures module.
Note: To be able to trigger the Flight1 G1000 failures from FS-FlightControl not only the Flight1 G1000 plug-in needs to be installed in flight simulator, but also the Flight1 VISPRO plug-in.
Aircraft Related Settings
All settings in this area will be saved together with the corresponding aircraft profile if aircraft related settings are enabled.
Aircraft Profile

By default aircraft related settings are disabled as this is not needed for many users, especially also if you only use FS-FlightControl with one specific aircraft type.
But if you want to use FS-FlightControl together with very different aircraft types it makes sense to enable aircraft related settings here.
Profile Settings
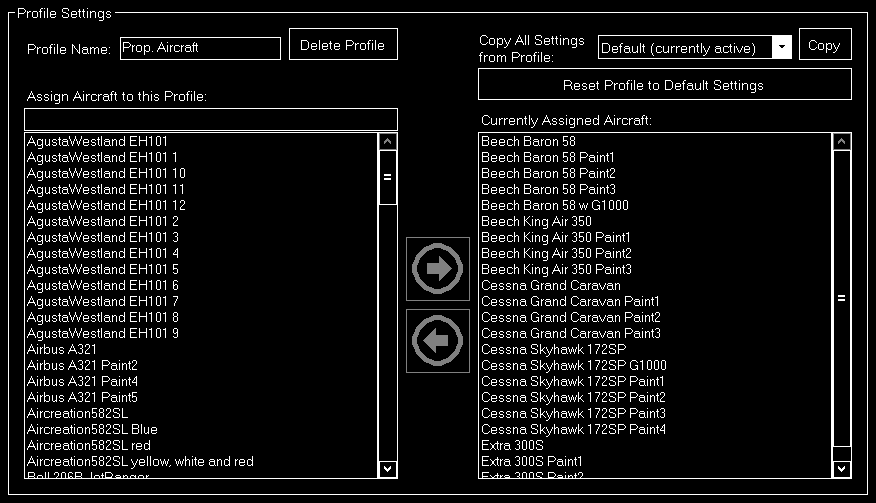
If aircraft related settings are enabled the profile settings section gets enabled as well.
You can edit or create new aircraft profiles here and change the flight simulator aircraft that are assigned to the current aircraft profile.
Whenever one of those aircraft gets loaded in the simulator FS-FlightControl will switch to this profile.
Additionally you can copy all settings from another profile or revert all settings to default.
Position
These settings are related to the Position module.
Final Position
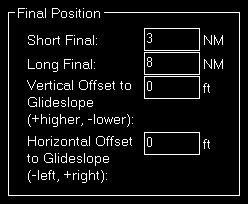
Here you can define the distance of the short and long final approach as well as a vertical and horizontal offset to the glideslope if you want.
Vectors Position
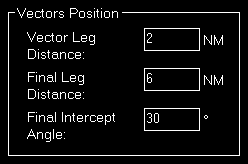
The distances for the vector positions can be changed here as well as the final intercept angle.
Base Position

Define here the distances for the base positions.
Downwind Position
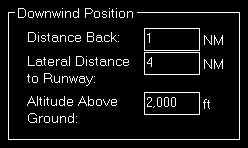
Here you can define the lateral distance to the runway for the downwind positions.
In contrast to the other positions where the altitude is calculated based on the runway glideslope automatically, the altitude for the downwind positions can be customized here.
Airworks
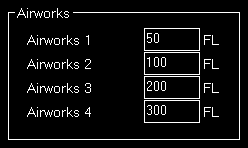
You can define the flight levels of the four airworks buttons here.
Options on Position Change
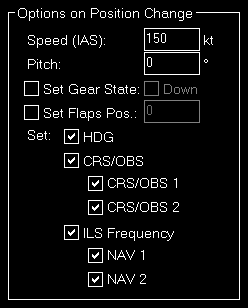
Depending on the aircraft capabilities you can change the parameters that are used when the aircraft is positioned.
This includes whether the heading, course (CRS) respectively omni bearing selector (OBS) or ILS frequency (if the runway is ILS enabled) should be set automatically with the aircraft position change to a certain approach.
Airport/Runway Restriction
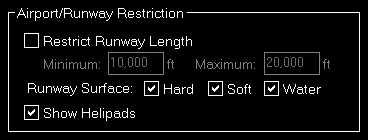
You have the option to hide certain airports and runways based on the runway length and surface here. You can also choose if helipads should be displayed.
Note: This will be applied everywhere in the program and will completely remove those airports and runways. On the Map airports will be displayed as long as at least one of the runways meet the criteria here.
Map Colors
These settings are related to the Map module.
Colors and Text Settings
In this area you can highly customize the appearance of the map.
We decided to put this into the aircraft related settings. Although this seems not to be aircraft related at first sight, it enables you to emphasize certain map parts based on the currently loaded aircraft: For example when using a small aircraft you might want to highlight more the small gates and do not care a lot about ILS, but when using a big jet the large gates are much more interesting. Same goes for other parts on the map which might be more interesting for certain aircraft types than others.

All colors and text sizes can be defined per map type. Therefore please first select the map type.
For a simple color selection the Select Color dialog is used.
Colors and Text Sizes for Map Type

Here all currently defined colors and text sizes are displayed for the selected map type.
The Structure Color is always the color of the item itself, like the runway surface of the runway, whereas Text Color the color of the corresponding text is, like the runway idents of the runway.
The Min. Zoom next to the Structure Color defines the minimum map zoom level needed that this structure (like the runway surface) is shown. Accordingly, the second Min. Zoom next to the Text Color defines the minimum map zoom level needed that the corresponding text (like the runway idents) is shown.
Font Size, the last column, enables you to define the size of the displayed text.
Parking
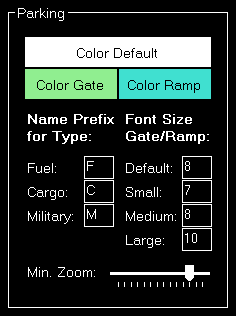
This area lets you define colors and text sizes for the different parking types like gates and ramps depending on their sizes.
Additionally you can define text prefixes to be used for a certain type like fuel, cargo or military and the minimum zoom level when gates and ramps should be displayed.
Tooltip
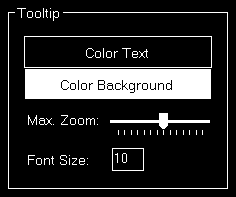
When hovering over certain map elements like an airport a tooltip is displayed showing the full name of the airport.
In this section you can define the appearance of this tooltip as well as up to which map zoom level the tooltip should be displayed.
Map Other
These settings are related to the Map module.
Auto Zoom
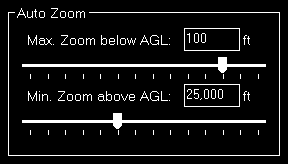
The Map module also features an auto zoom function which will zoom the map in and out according to the current aircraft altitude.
You can configure this feature here by first entering the maximum zoom level (fully zoomed in) that should be reached if the aircraft is below the entered altitude above ground.
Then, for the upper end, you define the minimum zoom level (fully zoomed out) that should be reached above the entered altitude.
Between these two altitudes the zoom will be equally divided automatically.
Aircraft Display
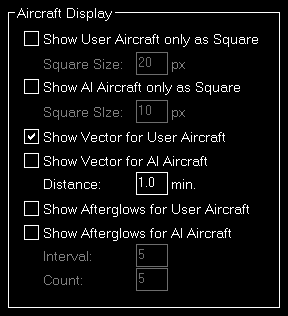
Here you can choose from certain options related to the display of the aircraft on the map.
First you can define if the user and/or AI aircraft are only shown as squares instead of an aircraft image. In this case you can also enter a size for the squares.
Furthermore you can enable or disable a distance vector being displayed in front of each user and/or AI aircraft. In this case you can enter the length of the vector in minutes.
Additionally so called afterglows - dots behind the aircraft - can be enabled or disabled for user and/or AI aircraft. In this case you can enter an interval as well as the number of dots that should be displayed.
Reposition
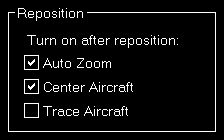
In this section you can define if certain map features are automatically turned on after the map reposition function was used.
Compass Rose

Use these settings to define the maximum zoom level up to the compass rose (when this function is enabled) should be displayed and how wide its radius should be.
Other
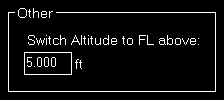
Here you can define at which altitude the display should switch from precise altitude display to flight level.
Note: Above this altitude it will also switch from show MSL altitude to indicated altitude.
Pushback
These settings are related to the Pushback module.
Speed Options
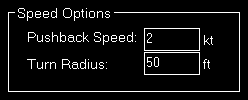
Here you can define the pushback speed as well as the turn radius.
Failures
These settings are related to the Failures module.
Hide Failures
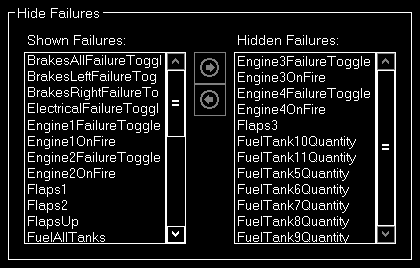
If you own a commercial license you can hide certain not relevant failures from the user.
Aircraft
These settings are related to the Aircraft module.
Aircraft Warnings
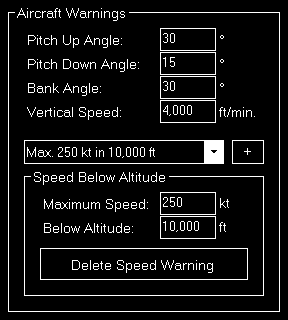
Here you can set limits for some parameters like pitch or bank angle for the aircraft.
Speed Below Altitude
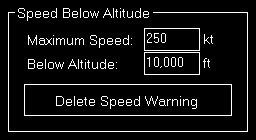
Additionally you can define maximum speeds below certain altitudes above mean sea level (MSL).
These settings are used to change the color of the corresponding value to red on the Aircraft module and also to show warning indicators when exporting graph data to Google Earth on the Statistics module.
Aircraft Gauge Options

Here you can choose certain display options for the aircraft gauges.
Six Pack
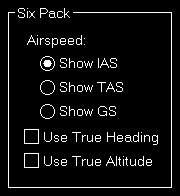
Choose weather you want to see indicated airspeed (IAS), true airspeed (TAS) or ground speed (GS) being displayed.
Also you can select if you would like true heading (in contrast to magnetic heading) and true altitude (in contrast to indicated altitude) being used.
PFD
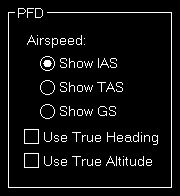
For the Primary Flight Display (PFD) you have the same display options as for the six pack above.
Custom Buttons
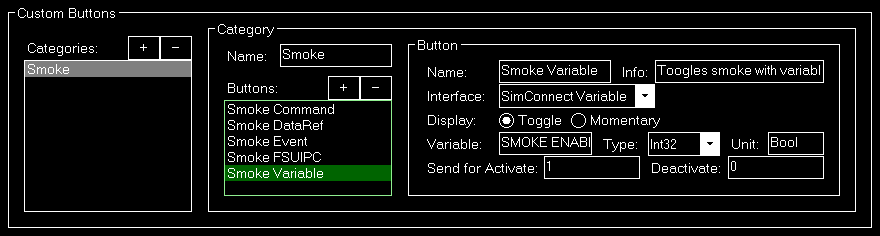
You can create custom buttons here that will trigger certain flight simulator functions directly.
These buttons can be arranged into categories which you can create first.
Category
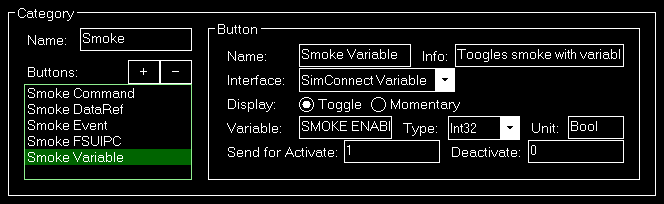
Once you assigned a name to the category you can add any number of buttons to it.
Button
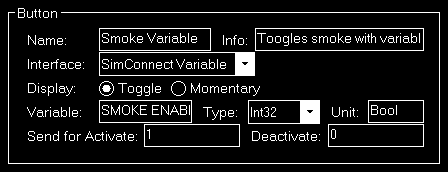
The button needs a name first and an optional info text which will be displayed as tool tip.
Next you need to select the interface that should be used for this button and choose if the button should have a toggle functionality or it should be momentary only: In case of toggle it will send two different values (like on and off) depending on its current state and in case of momentary there is no state and it sends always the same value.
Depending on the interface selected you need to enter a certain data or command ID, assign a data type and a unit to it.
Furthermore, you can enter a value that should be sent to activate and - in case of a toggle button - also a value to deactivate.
Examples and Reference
In the following you will find one example for each interface supported:
| Interface | Data or Command ID | Type | Unit | Send for Activate | Send for Value Deactivate |
|---|---|---|---|---|---|
| SimConnect Event | SMOKE_TOGGLE | - | - | 0 | 0 |
| SimConnect Variable | SMOKE ENABLE | Int32 | Bool | 1 | 0 |
| X-Plane Command | sim/flight_controls/smoke_toggle | - | - | - | - |
| X-Plane DataRef | sim/operation/failures/rel_smoke_cpit | - | - | 6 | 0 |
| FSUIPC Offset | 05D8 | Int16 | - | 1 | 0 |
Note: The number behind type names are bits. Therefore a FSUIPC offset that like in the above example that has 2 bytes needs to be set to the integer type with 16 bits.
And here some references to create those examples:
| Interface | Reference |
|---|---|
| SimConnect Event | Lockheed Martin Website for Prepar3D, Microsoft Website for FSX and FS2020 |
| SimConnect Variable | Lockheed Martin Website for Prepar3D, Microsoft Website for FSX and FS2020 |
| X-Plane Command | Commands.txt in Resources\plugins below X-Plane installation folder |
| X-Plane DataRef | DataRefs.txt in Resources\plugins below X-Plane installation folder |
| FSUIPC Offset | FSUIPC4 Offsets Status.pdf in Modules\FSUIPC Documents below Prepar3D/FSX installation folder |
Note: Using these custom buttons requires considerable knowledge on how the internals of Prepar3D/FSX/X-Plane and their add-ons work. We do not provide any support on how a certain variable, event, command, DataRef or offset can be used!
Other

Here you can define if flap positions should be shown as degree number.
Statistics
These settings are related to the Statistics module.
Google Earth Export
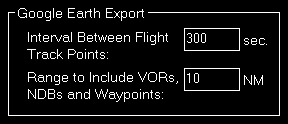
Define all Google Earth export related settings in this area.
Every certain time interval a flight track point is shown in Google Earth with detailed flight information. You can set this time interval here.
Additionally you can define the range for including VORs, NDBs and waypoints if their export is enabled.
Third Party
Here you can enable certain aircraft-specific functionality related to supported third party products.
Use Third Party Aircraft Options
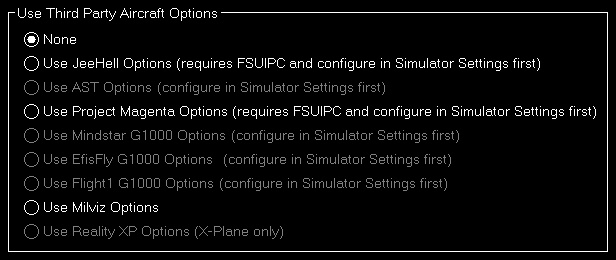
You can choose which third party aircraft options should be used.
Note: For some options additional parameters need to be entered in the third party simulator settings first.
Other Settings
All settings in this area are not simulator and not aircraft related and will be saved globabally.
Position
These settings are related to the Position module.
General

First you can enable an additional confirmation dialog before the airport position is changed.
You can also enable or disable some automatizations after an aircraft position is changed.
First choose if position freeze or pause should be enabled after aircraft move.
Additionally you can define if the program should automatically switch to the Map module after a position change respectively to the Statistics module when an approach is started.
FS-FlightControl calculates the runway take-off position internally as the location of the very end of the runway plus 50 m towards the runway center. But optionally you can change this to use a defined starting position of the scenery (if available). As these starting positions are sometimes located at the holding point instead, this option is turned off, by default.
Flight Situation Presets

You can choose here to not automatically save the flight plan together with a flight situation preset.
Map
These settings are related to the Map module.
Refresh Rate
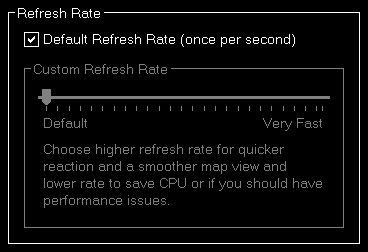
You can define here how often the map view gets updated.
By default that is set to once per second.
Custom Refresh Rate
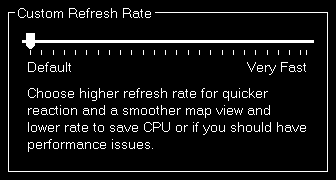
If you uncheck the Default Update Rate checkbox you can define the update rate yourself.
The slider then ranges from very low (every 60 visual frames on flight simulator) to very high (every single visual frame).
Note: Please keep in mind that setting the data update rate to very high may lead to performance issues.
Grid and Minimum Sector Altitude (MSA) Display
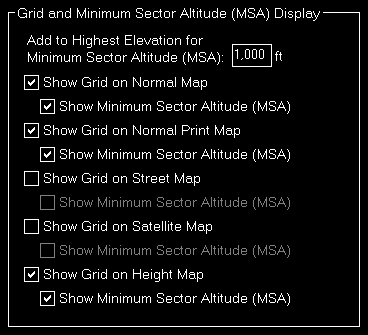
First you can define here the altitude that is added to the highest elevation in each sector when calculating the Minimum Sector Altitude (MSA).
Additionally you can choose when the map grid including the Minimum Sector Altitude (MSA) is displayed in the first place.
Aircraft Information Text
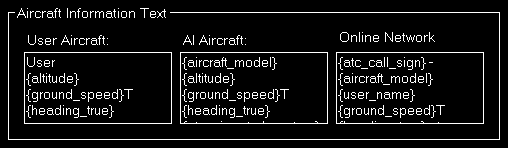
You can customize the text that is displayed next to the aircraft here.
Different texts can be defined for the user aircraft, AI aircraft as well as aircraft from online networks.
Following placeholders are available within those texts:
| Placeholder | Description | User | AI | Online |
|---|---|---|---|---|
| {latitude} | Aircraft latitude. | X | X | X |
| {longitude} | Aircraft longitude. | X | X | X |
| {altitude} | “GROUND” if on ground, altitude MSL below switch to FL map setting and FL above that. | X | X | X |
| {altitude_indicated} | Aircraft indicated altitude. | X | X | |
| {altitude_msl} | Aircraft altitude above mean sea level (MSL). | X | X | X |
| {altitude_agl} | Aircraft altitude above ground level (AGL). | X | X1 | |
| {airspeed_indicated} | Aircraft indicated speed (IAS). | X | X1 | |
| {airspeed_true} | Aircraft true speed (TAS). | X | X1 | |
| {ground_speed} | Aircraft ground speed. | X | X | X |
| {heading_magnetic} | Magnetic aircraft heading. | X | X1 | |
| {heading_true} | True aircraft heading. | X | X | X |
| {vertical_speed} | Aircraft vertical speed. | X | X | |
| {aircraft_title} | Aircraft title. | X | X1 | X |
| {aircraft_type} | Aircraft type (like the manufacturer). | X1 | ||
| {aircraft_model} | Specific aircraft model. | X1 | X | |
| {current_state} | Current aircraft state: Like Parking, Taxi or In Flight. | X | X | |
| {atc_call_sign} | Call sign. | X1 | X1 | X |
| {atc_airline} | Airline name. | X1 | ||
| {atc_flight_number} | Flight number. | X1 | ||
| {atc_airport_departure} | Departure airport as filed. | X1 | X | |
| {atc_airport_arrival} | Arrival airport as filed. | X1 | X | |
| {atc_airports} | {atc_airport_departure} → {atc_airport_arrival}, if both variables available. | X1 | X | |
| {atc_flight_rules} | Flight rules as filed. | X1 | X | |
| {atc_airport_alternate} | Alternate airport as filed. | X | ||
| {atc_route} | Flight route as filed. | X | ||
| {atc_remarks} | Flight plan remarks. | X | ||
| {atc_etd} | Estimated time of departure as filed or (for online aircraft) actual time after departure. | X1 | X2 | |
| {atc_ete} | Estimated time en-route as filed. | X2 | ||
| {atc_eta} | Estimated time of arrival as filed. | X1 | X2 |
Note X1: Not available for X-Plane.
Note X2: Not available for PilotEdge.
Display Options
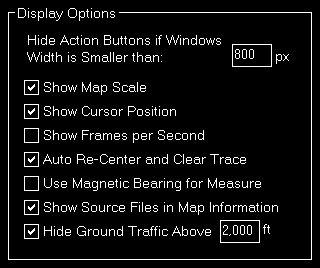
You can define several display options here.
First you can set a window width below that the left and right action buttons are hidden.
Note: This is only used for detached map windows. Please note that the action buttons are also hidden if the height of the window is not enough to show all of them.
Below that you can choose if you want the map scale, cursor position and frames per second displayed on the bottom of the map view or not.
Additionally you can disable the automatic re-center of the map and clear aircraft trace (if enabled) after the aircraft position has been changed from the flight simulator itself (after there was a crash, for example).
By default, true bearings are shown when the measure function is used. This can be changed to magnetic bearings here.
There is also an option to enable or disable the display of scenery source files in the map information dialog: This might help with identifying issues during database build.
If you do not like to see other aircraft on the map that are on ground while you are flying you can hide ground traffic above a certain altitude above ground level.
Map Background Data Provider
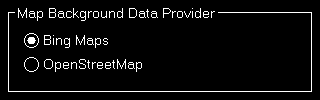
You can select here either Bing Maps or OpenStreetMap as map background data provider.
Note: Please note that satellite map is only available with Bing Maps.
Online Networks
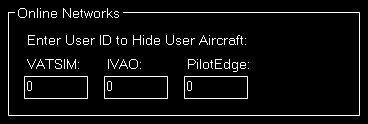
If you enter here your user ID of the available online networks your own user aircraft will not appear additionally as AI aircraft.
Points of Interest (POIs)
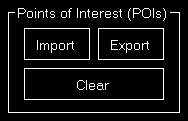
Here you can import or export points of interest (POIs) as CSV files.
Also removing all the existent points of interest is possible
Holdings
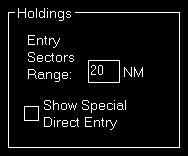
You can define here how large the entry sectors are drawn around the holding.
Additionally you can choose if also the special direct entry (next to the regular direct entry) is displayed.
Flight Plan
These settings are related to the Flight Plan module.
Time Remaining
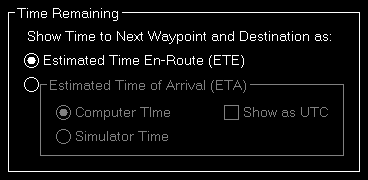
Select here if the remaining time to the next waypoint and to the destination should be shown as estimated time en-route (ETE) or estimated time of arrival (ETA).
Estimated Time of Arrival (ETA)

If you have selected the ETA option you can further decide if this time should be calculated based on your computer or the simulator time and if this time should be displayed as local time or UTC.
PFPX
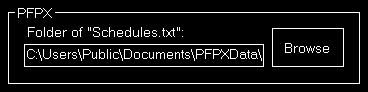
You can enter the path to the PFPX documents directory here. The PFPX connection then can be used to import scheduled flights.
SimBrief

You can enter your SimBrief user name here. The SimBrief connection then can be used to import from SimBrief.
Conditions
These settings are related to the Conditions module.
ILS Visibility
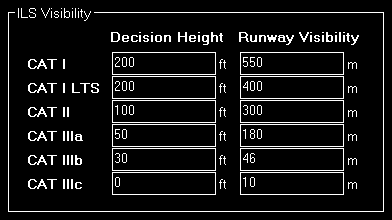
In this section the ILS Visibility presets can be customized.
You can define the decision height as well as the runway visibility for each ILS category.
Sound
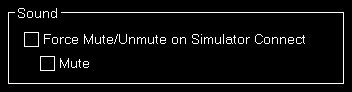
If you would like the simulator to be always muted or unmuted after connection is established you can set this here.
Real-Time Weather Source
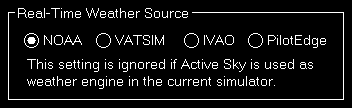
Define here the real-time weather source that should be used for receiving weather METAR data if this is not provided by flight simulator directly.
In this connection you can choose from NOAA (National Oceanic and Atmospheric Administration), VATSIM (Virtual Air Traffic Simulation), IVAO (International Virtual Aviation Organization) and PilotEdge.
Note: When Active Sky is used as weather engine for the active simulator this setting is ignored and always Active Sky itself used as real-time weather source.
Other

By default the Simplified Weather Control is activated.
That means that FS-FlightControl takes full control of the simulator weather and this way can always ensure what you see in the Conditions module is synchronized with the simulator weather.
This allows especially the custom weather interface to be considerably simplified as there is no longer a need to actually send a weather change due to it being synchronized in the background all the time anyway.
Therefore normally you want to keep this option enabled.
The only time you might consider disabling it is if you try to use external weather tools that are not supported through an interface by FS-FlightControl. In this case you should disable this option here as otherwise FS-FlightControl will constantly try to override the weather change by other tools.
View/Slew
These settings are related to the View/Slew module.
Custom Camera Positions
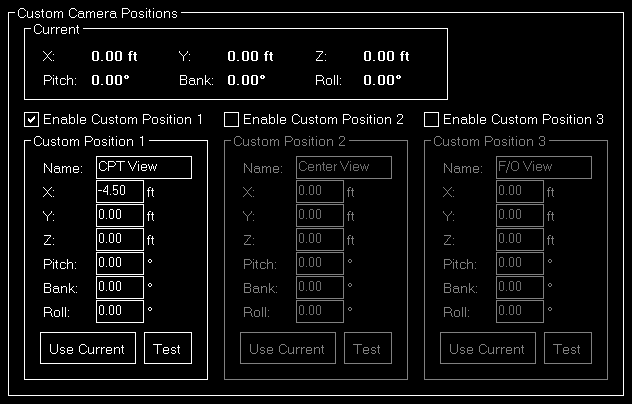
If you own a commercial license this section allows you to define custom camera positions to reduce the parallax effect.
Current
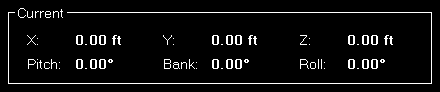
Here you can see the current camera position.
Note: This information is currently only provided by X-Plane.
Custom Position

You can enable up to three custom positions.
Set a name for the custom position button displayed in the View/Slew module first.
Then you can define an offset for all six degrees of freedom.
Use the Use Current button to take over the current camera values or the Test button to send the manually inserted values to the simulator to test the effect.
Other

You can hide the back to cockpit buttons here if they are, for example, not supported by the aircraft model.
Failures
These settings are related to the Failures module.
Color Settings
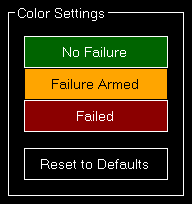
Use this area to change the colors. For a simple color selection the Select Color dialog is used.
You can also use the button Reset to Defaults to revert all your color changes.
Other
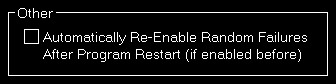
Choose here if random failures should be automatically re-enabled on program start if they were enabled before.
Statistics
These settings are related to the Statistics module.
Color Settings
In this area you can customize all colors used to draw the statistics graphs.

All colors can be defined per display type. Therefore please first select if you want to change the colors for the normal in program display or for printout.
For a simple color selection the Select Color dialog is used.
Revert to Defaults

You can easily revert all colors to their defaults by using the Revert to Defaults button.
Colors for Display Type
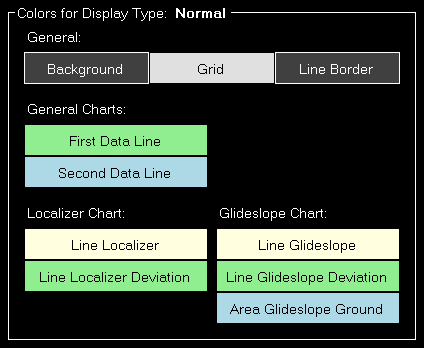
Here all currently defined colors are displayed for the selected display type.
Click on any of the buttons to select a different color.
Recording
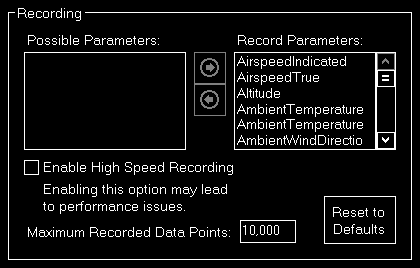
Recorded parameters are available to be displayed in the general statistics and are also included in the CSV data export.
If you own a commercial license you can choose from a wide range of parameters and include them in the recording.
Additionally you can also enable high speed recording which will record values with the maximal possible frequency offered by the simulator (otherwise, by default, the recording is only once per second).
Especially on computers with little amount of memory you have the option to limit the amount of recorded data points.
Use the button Reset to Default to set the recording options back to the defaults.
Approach Options

You can choose if the localizer information from the simulator should be used during approach recording or the localized deviation should always be calculated internally.
Network
These settings are related to the Network module.
FS-FlightControl Client
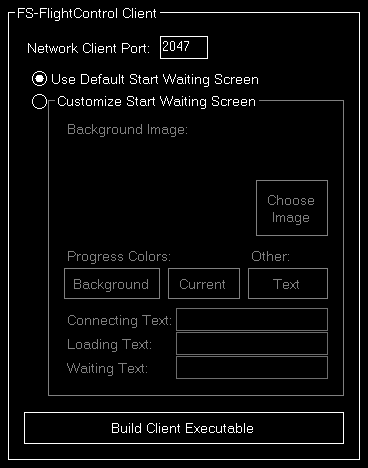
First you can change the network client port here that defaults to 2047, but can be changed to any other port number if needed.
Note: If you change the port you need to re-build the network client executable.
Customize Start Waiting Screen
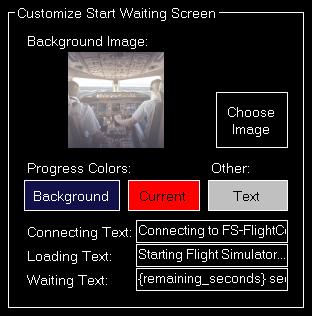
If you own a commercial license you can completely customize the start waiting screen that is shown on the network client computers.
You can select a background image as well as customize the colors and the shown texts. For a simple color selection the Select Color dialog is used.
In the Remaining Text input field you can use the placeholder {remaining_seconds} to insert the remaining seconds.
Program Close Options

You can define here if a shutdown, hibernate or sleep action should be sent to all connected network computers when the FS-FligthControl software is closed.
Additionally you can decide if the same action should be executed on the computer running the instructor station itself.
Status Page for Web Display
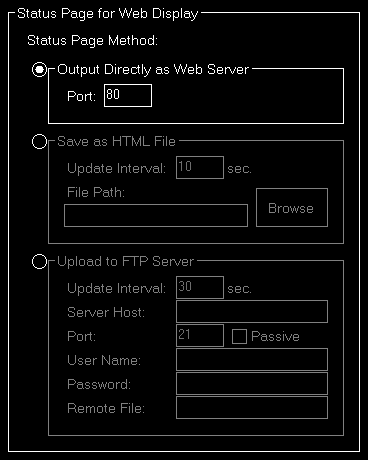
In this area you can define the method that should be used for the status page output.
Output Directly as Web Server
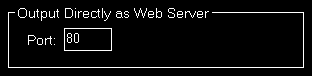
If this method is selected FS-FlightControl will listen on the defined port for HTTP web requests and will reply with the status page accordingly.
Save as HTML File
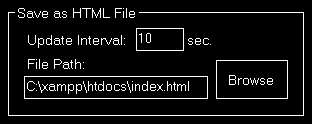
This method will save the status page as HTML file to a certain directory location in the defined time interval.
Upload to FTP Server
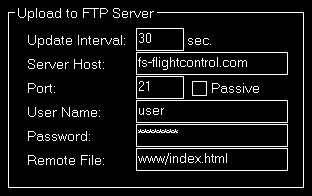
You can also enable this method to automatically upload the status page to a FTP server.
Then you need to define again the update interval as well as all parameters that are needed for FTP server access.
Mobile Devices
This section is related to the mobile devices support.
Android and iOS Client
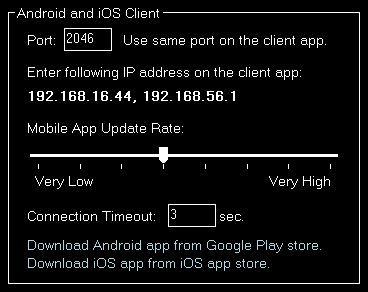
There is an Android and iOS client app that makes it possible to use FS-FlightControl also on your Android tablet device or iPad.
You can define the port here that should be used for the connection. It defaults to 2046.
In the following you can see the IP address that you need to enter in the Android or iOS app once for connection.
Note: It rare cases it is possible that there is more than one IP address displayed here. In this case you just need to try which one works.
If you should see a Windows Firewall message popping up - normally on program start - asking you to give FS-FlightControl access please confirm that. Only with this approval you will be able to connect with your mobile device.
There is an option to change how often the client app gets screen updates: Increasing this value will make a smoother user experience on the mobile devices, but also considerably increase load on the Desktop application. With the connection timeout you can define how quickly the app gets disconnected.
You can directly download the Android app from the Google Play store as well as the iOS-App from the iOS App Store.
Units
Here all units for input as well as output used across the whole program can be defined.
Altitude Unit
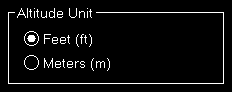
Choose if feet (ft) or meters (m) should be used for altitude values.
Temperature Unit
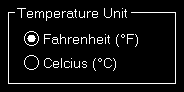
Choose if Fahrenheit (°F) or Celcius (°C) should be used for temperature values.
Atmospheric Pressure Unit

Choose if Hektopascals (hPa) or Inches of Mercury (inHg) should be used for atmospheric pressure values.
Other Pressure Unit
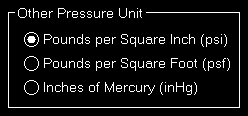
Choose if Pounds per Square Inch (psi), Pounds per Square Foot (psf) or Inches of Mercury (inHg) should be used for other pressure values.
Weight Unit

Choose if kilograms (kg) or pounds (lbs) should be used for weight values.
Short Distance Unit

Choose if feet (ft) or meters (m) should be used for short distance values.
Far Distance Unit

Choose if nautical miles (NM) or kilometers (km) should be used for far distance values.
Weight Unit
Choose if kilograms (kg) or pounds (lbs) should be used for weight values.
Speed Unit
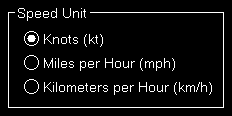
Choose if knots (kt), miles per hour (mph) or kilometers per hour (km/h) should be used for speed values.
Liquid/Fuel Unit
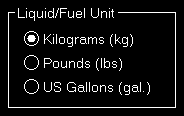
Choose if kilograms (kg), pounds (lbs) or US gallons (gal.) should be used for liquid and fuel values.
Visibility Unit
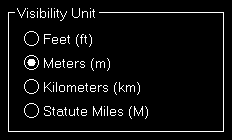
Choose if feet (ft), meters (m), kilometers (km) or statute miles (M) should be used for visibility values.
Thrust Unit
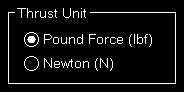
Choose if found force (lbf) or Newton (N) should be used for thrust values.
Torque Unit
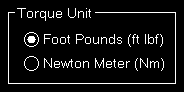
Choose if foot pounds (ft lbf) or Newton meter (Nm) should be used for torque values.
GEO Position

Choose if GEO positions should be displayed as degrees, minutes and seconds or as a decimal value.
Color
Here you can find the global color settings.
Color Settings
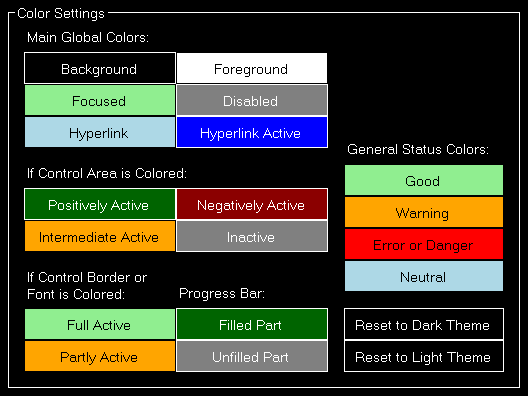
Use this area to change the colors of this program. For a simple color selection the Select Color dialog is used.
There are two predefined color themes which you can revert to using the Reset to Dark Theme and Reset to Light Theme buttons.
After doing so you will be asked if you would also like to adjust the colors of the normal map, statistics and failures to the color theme defaults which we would recommend to do.
Access Control
There is an optional add-on module for FS-FlightControl that allows to control simulator access.

If you have purchased this additional module you can enable the access control functionality using this check box.
Note: It is highly recommended to also enable the Settings Password Protection as otherwise bypassing access control would be very simple for the user.
Simulator Access Control Settings
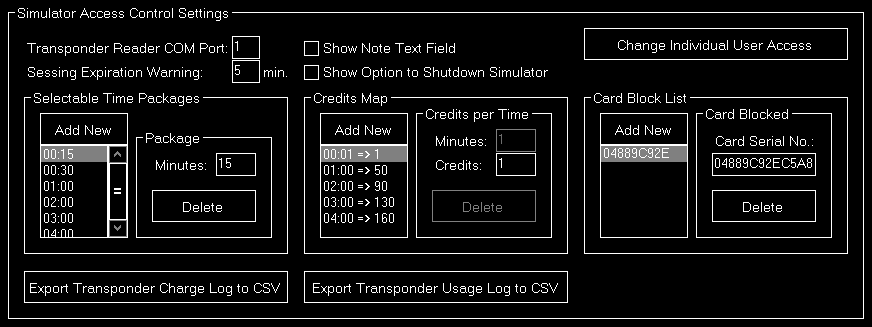
Once access control is enabled you can configure it here.
First you need to define the COM port used by the hardware transponder reader you have received from us. You can check the COM port in the Windows Device Manager.
You can also set the session expiration warning here which will warn the user a certain time before the session expires.
Furthermore a note text field can be enabled which allows the user to leave a note for the transponder usage log.
If you would like the users to be able to shutdown the simulator you can enable a shutdown button on the lock screen.
Both the transponder charge as well as the transponder usage log can be exported here as CSV files as well.
Selectable Time Packages
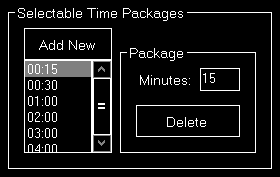
On the lock screen the users can choose between different session time packages which you can specify here.
Package
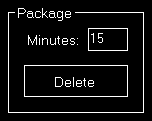
You can set the number of minutes the simulator should be active when the user selects this time package.
Credits Map
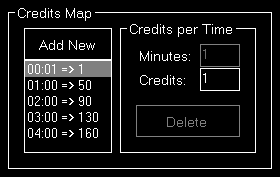
When the user starts a simulator session a certain amount of credits is deducted from his transponder.
This credits map defines how many credits are needed for a certain amount of time.
If there is no credits relation defined here that fits to the selected session time package exactly it will use the largest credits relation and fill it up with the next lower one till all minutes are charged.
That is also the reason why you cannot delete the one-minute (smallest possible unit) credits relation.
Credits per Time
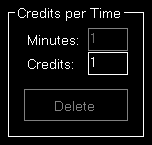
Define here how many credits get charged for a certain number of minutes.
Card Block List

If a user reports a transponder for example as lost you can add its serial number to the card block list.
In case the user then still tries to use this card it will be rejected.
Card Blocked
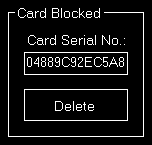
Enter the serial number of the transponder that should be blocked here.
User Access Control
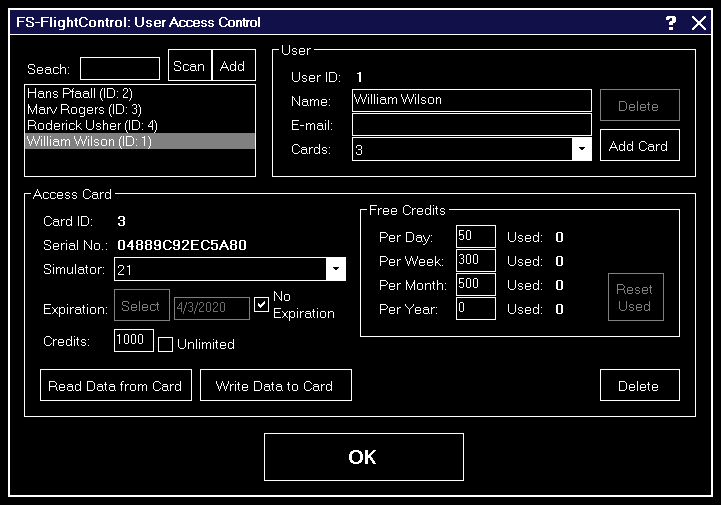
Here you can change the simulator access settings of individual users.
First you can search for an existing user, also by scanning an existing transponder card.
A new user can be added here as well.
User
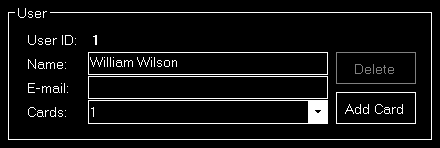
Users are assigned a name and an optional e-mail address.
You can then add access card to a user.
A user can only be deleted again if no cards are assigned to this user.
Access Card
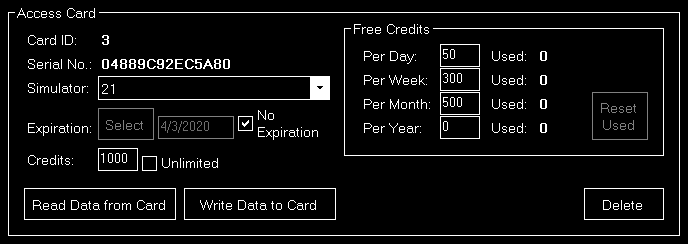
Here you can define expiration date of the transponder card as well as the amount of credits this card should have.
A card can be also valid indefinitely and credits can be set to unlimited as well. Use the Select button to open the Select Date dialog.
This might be useful if you do not really need to control the access to the simulator, but would rather like to track its usage: In this case you can hand out cards with unlimited credits to your users and this way track who is using the simulator for how long without actually restricting the usage.
Free Credits

You can also set a certain amount of free credits per day, week, month or year. Not used credits will expire after the corresponding period of time.
This allows the user to use the simulator for a certain amount of time free of charge without reducing his actual card credits.
Use the button Read Data from Card to see also the currently used amount of the free credits. The button Reset Used allows you to set this back to zero again.
After you are changing the expiration date or any credits options do not forget to use the button Write Data to Card to actually save your changes to the card.
Other
In this section all other settings are located that do not fit into another category.
Input and Help
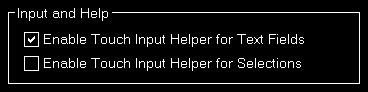
Here you can define if a touch input helper should be used for text and selection input fields.
Note: While the Android or iOS app is connected both touch input helpers are activated automatically.
Display Options
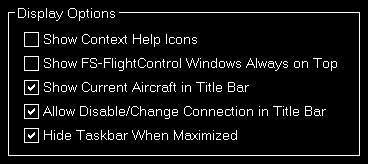
Additionally you can choose if the small help icons should be displayed in the top right corner of all sections.
Furthermore you can make the FS-FlightControl window to stay always on top of all other applications.
There is the option to show or hide the aircraft name as well as allow to disable or change the simulator connection by clicking on the connection text in the title bar.
You can also choose to hide the Taskbar when the application window is maximized.
Program Startup and Exit Options
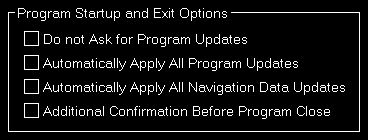
To allow a program start without user interaction you can define here that program updates as well as navigation data updates should always be applied without confirmation by the user.
Alternatively you can also disable the question regarding an update completely (which we do not recommend).
Furthermore you have the option here to activate an additional confirmation message before the program is really closed - in case of accidental clicks on the Exit button.
Online Network Status URLs

Here you can change the URLs where FS-FlightControl gets the status updates for VATSIM, IVAO and PilotEdge from.
This might be useful if you operate your own multi-player server. If you use, for example, the VATSIM format for providing online client information, you can inject this information into FS-FlightControl by pointing the VATSIM URL here to your own server.
You can also reset these URLs to their defaults.
Main Buttons
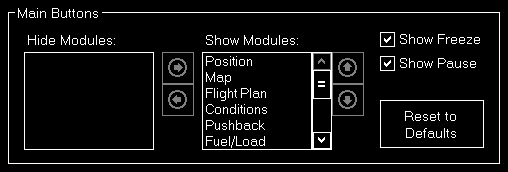
In case you do not need or use certain FS-FlightControl modules you can hide and even sort the related main buttons in the bottom of the screen.
You can also choose if you would like to see the Freeze and/or Pause button.
Use the button Reset to Default to restore all main buttons.
Unpause Delay
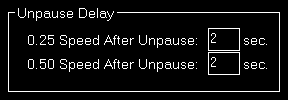
You can configure the unpause delay to your needs here.
This will be used to slowly accelerate your aircraft after the simulator was unpaused through FS-FlightControl.
To deactivate the unpause delay altogether just enter a 0 for both values.
Note: This option has no effect if you are connected to X-Plane.
Settings Password Protection
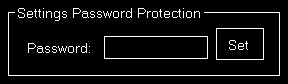
If you own a commercial license you can protect the settings with a password.
This ensure that only people who know this password will be able to access and change application settings.
To remove the password protection again leave the field empty and hit the button Set.
Print Options

You can define here which printer should be used within this application.
Additionally, if you own a commercial license, you can also change the footer text or remove it completely.
Within the footer text you may use the placeholders {date}, {time} and {simulator_name} to insert the current date and time.
Reset Window Location/Size

Use the button Move All Windows to Top Left if some application windows are no longer visible due to changes of connected monitors.
Use the button Reset Size of All Windows to Default in case you see application windows being unintentionally too large or small.
Send GPS Data
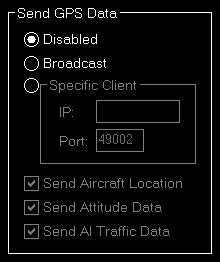
This section allows to enable a GPS data broadcast to feed thirdparty apps like ForeFlight, WingX Pro, Aerovie, FltPlan Go and SkyDemon with position data from your flight simulator.
Specific Client
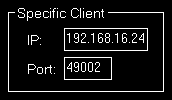
Normally it is enough to just broadcast the data to any client in the network, but if you would like to send it only to a specific one you can enter its IP address and port number here.
Other

By default the button Freeze only freezes the aircraft position.
If you would like to have also the altitude frozen, you can select this here.
Note: When X-Plane is used altitude is always frozen as well as it does not support freezing position only.